How to submit data via the Submission Portal
How to upload your XML for submission to Sheep Genetics
Step 1.
Log into your Sheep Genetics account and scroll down to the ‘Your flocks’ box, then click the ‘submissions’ button (Figure 1) to take you through to the submission portal (Figure 2)

Figure 1. ‘Your Flocks’ box and the ‘SUBMISSIONS’ button which will take you to the submission portal

Figure 2. ‘Submission portal’ page
Step 2.
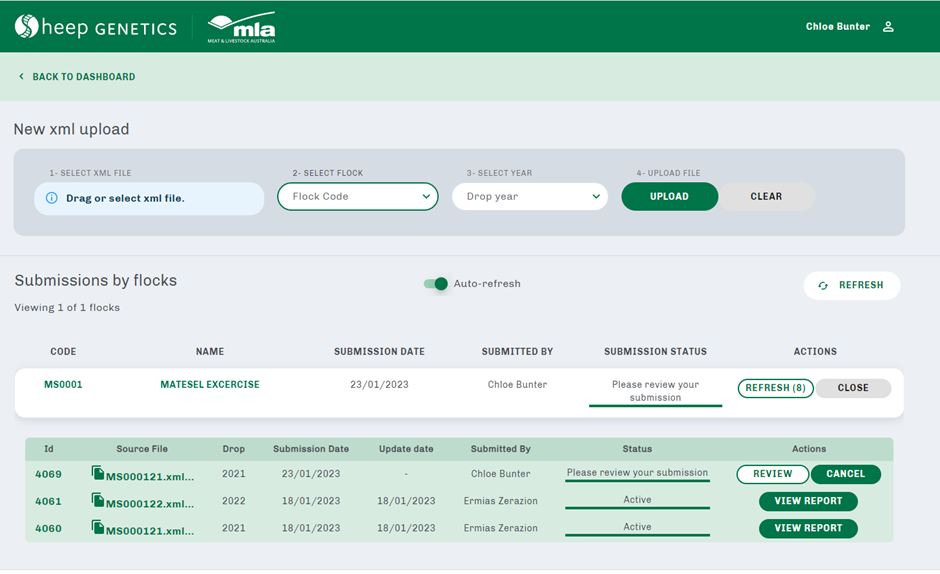
Find the location of your XML file you wish to upload on your computer, click the file and drag and drop it into the blue box ‘Drag or select XML file’ (see C of Figure 3). Alternatively, click the blue box ‘Drag or select XML file’ (see C of Figure 3) and click to find the location of your file on your computer, select the file and click open. The ‘Flock Code’ (A of Figure 3) and ‘Drop Year’ (B of Figure 3) will prepopulate as per the file name. Check that the correct flock code and drop year have been prepopulated

Figure 3. Submitting your XML into Sheep Genetics
Step 3.
Then click upload to begin the submission process. It may take a while to upload, be patient while the file is submitted for upload.
If you have uploaded an incorrect file, click ‘clear’ and re-start the steps with the correct XML.
Step 4.
Once the file is uploaded, you will see a green ‘Upload successful: processing on server…” box pop up (Figure 4).
If your file is not uploaded successfully at this stage, it has not passed initial validation. This may be due to an incorrect file type, incorrect file name, or incorrect data (i.e., incorrect IDs, 2021 data included in file but file name says 2022, etc.).

Figure 4. Uploading XML
Step 5.
During the uploading process, your file will undergo several validation and processing steps. These steps include checking the data is correct, flattening the file, comparison of the current submission to a past submission, etc. The file status will be updated accordingly through this process. This process is expected to take up to 10 minutes from submission to review (if the file submission is successful).
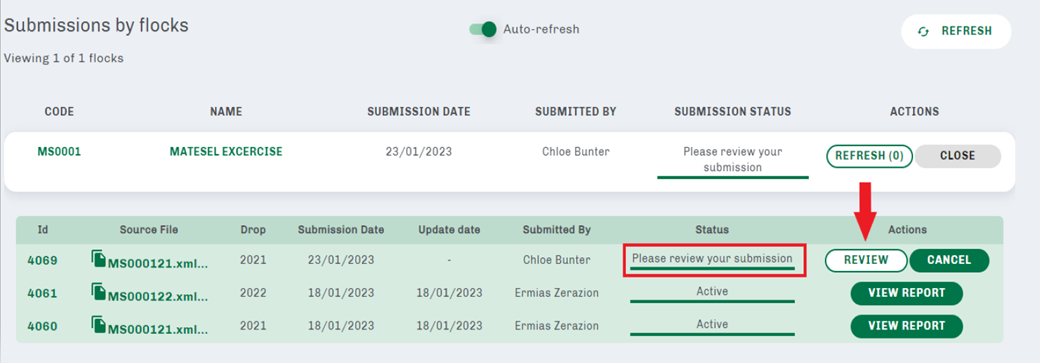
Once the upload is successful if the ‘status’ of the submission is ‘Please review your submission’ (Figure 5). Click the ‘Review’ button to check the submission summary.

Figure 5. Successful upload of an XML submission
Step 6.
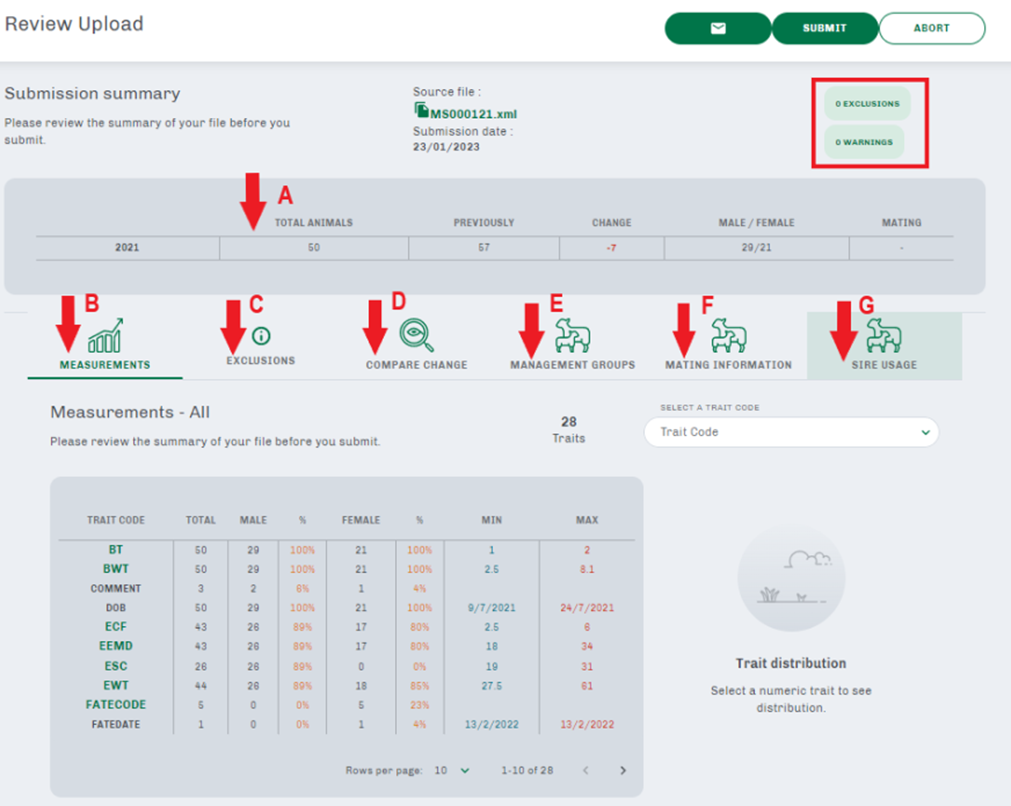
Overview your submission summary, taking careful note of the following;
Overall Summary (see A in Figure 6) – the year drop uploaded, total number of animals in the XML file, the number of changes, the ratio of male/female. Also take note of the number of exclusions and warning (red highlighted box in top right corner)
Measurements (see B in Figure 6) - the number of measurements for each trait, minimum and maximum values of measurement for each trait
Exclusions (see C in Figure 6) – if there is any data excluded or warning placed on any data you can see which records are being excluded/have a warning placed on them and why
Compare Change (see D in Figure 6) – any changes between the current submission and previous submission for the same year drop
Management Groups (see E in Figure 6) – check the name of management groups, number of groups and number of animals in each group matches to what is occurring on farm
Mating Information (see F in Figure 6) – check mate method, ewe ID, sire ID, mate date, number of records submitted
Sire Usage (see G in Figure 6) – check the sire IDs, stud of breeding, sire of sire details, and progeny ratio male/female is correct

Figure 6. review your submission summary
Step 7.
After reviewing your submission summary, you may attach a message (see A in Figure 7) to the submission for Sheep Genetics admin (i.e. whether you have removed a number of animals from the submission file). Alternatively, you can either submit the file (see B in Figure 7) or abort the submission (see C in Figure 7).

Figure 7. Attach a message, submit, or abort the submission
Step 8.
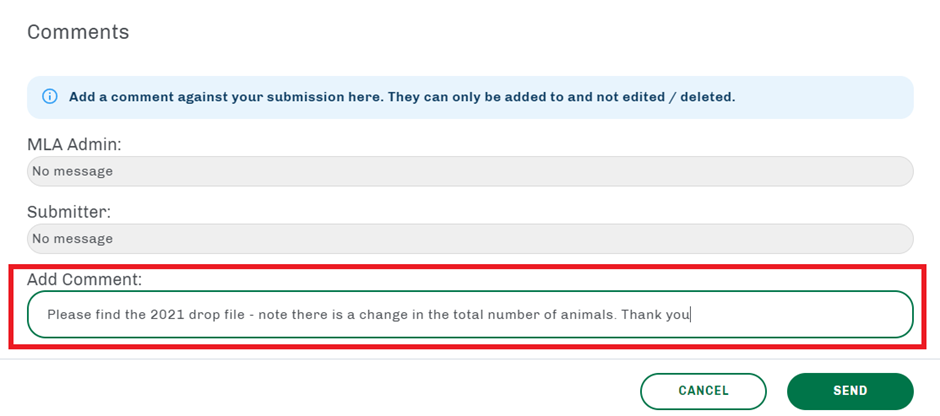
If you attach a note, write your message in the ‘add comment’ box (Figure 8) and click the green ‘send’ button – this will be sent to Sheep Genetics admin to read when they review your file submission

Figure 8. Send a message to Sheep Genetics admin about your file submission
Step 9.
Sheep Genetics admin may reply to this message where relevant. These messages will be logged against the specific file submission. You can read over the messages by clicking into the specific submission, then clicking the message icon.
Step 10.
After clicking the submission button, Sheep Genetics will overview your submission before it is sent to analysis. Your submission will show that is it ‘Waiting for MLA to review’ in the submission dashboard (Figure 9).

Figure 9. Your submission is ‘Waiting for MLA to review’ after submission
Step 11.
Sheep Genetics admin will then review your submission and accept or reject accordingly. Sheep Genetics admin can also reply to any messages sent with the submission file.
Step 12.
Once Sheep Genetics admin has reviewed and accepted your submission, your submission will read as ‘Active’ (Figure 10) and will be sent for analysis in the next run.

Figure 10. Your submission is approved and active for genetic analysis